Wednesday, June 27, 2012

my g'ma pittman's casserole

i thought i'd share a super easy recipe with you all.  i made this tonight for dinner and, as always, there is very little left.  all 3 of my boys had 3rds helpings of this.  man, do they eat a lot!


to make it you need:

1 bag/box noodles (i usually use a 16 oz bag of egg noodles)
1 lb ground beef
1 onion, chopped
1 large can diced tomatoes (drained)
1 can mexicorn (drained)
shredded cheddar cheese
and
salt and pepper


as long as i keep these in my cupboard at all times, i can always make this family favorite! 
ground beef, onion, cheese and noodles are also pantry staples in my house.

first, pre-heat your oven to 350 degrees.


then, in a large pot, bring water to a boil and cook noodles according to package directions.
in a large skillet, brown the ground beef while also cooking the onions.  add salt and pepper to taste.

i bought this green pan specifically for making this recipe.  i used to have to brown the beef in one pan and then transfer everything into a casserole dish.  but now i just brown the beef, drain it and toss everything into the same pan.  one less dish to wash = a happy jenna.

of course, if you don't have a super huge, oven safe skillet/pan, you can just dump everything into a large casserole dish.


next, drain any excess fat from the beef and onions, then add the mexicorn and tomatoes.


drain the noodles before tossing them into the mix as well and then stir it all together.


sprinkle the top with some cheese and pop it in the oven for 30-35 minutes.


this deliciously cheesy wonderfulness will be ready to eat as soon as it cools off some!


this recipe is super easy to make and super easy to tweak, if you're missing something. 
substitute different types of noodles, chopped fresh tomatoes for canned, regular corn instead of mexicorn, or try adding other veggies like chopped peppers or olives... you get the idea. 

so simple and so good!
i hope your family likes it too!

Monday, June 25, 2012

hospital packing list

i am quickly approaching my 4th go at giving birth.  i'm 3 weeks from my due date still, which seems like a long enough time to get things together, assuming she doesn't show up early.  but i'm starting to have more and more thoughts on what i need to get done before our baby makes her grand debut.

i am a list maker and, perhaps, an over-thinker.  so here is my list of what i bring with me to the hospital.  i've seen several online.  they're everywhere.  and everyone has their own ideas of what's needed and not.  but, from my previous experiences, i seem to bring less each time.  there is so much that you "need" that you truly do not need at all... unless you just want to give your spouse a work out from hauling your crap all over the hospital for you.  =)


for the drive there, you may want to grab a plastic garbage bag and/or a towel to put under you.  if your water is broken, this is sorta obvious.  but, if it's not yet, you might thank yourself later, if it breaks en route.

for the actual birth, from check-in to that last push, you and/or your partner will want to have:
  • your ID
  • your insurance card
  • any registration paperwork/test results that you were told to bring with you
  • several copies of your birth plan- hand them out to any new nurses/doctors who come into the room.  it's far easier than explaining your preferences to everyone over and over again.  trust me, they'll thank you!
  • cameras (both video and still) fully charged with spare batteries, chargers, memory cards, tapes, etc.
  • short sleeved or sleeveless pajamas/nightgown (although i just skip this one, get naked and slip a hospital gown on myself.)
  • change for the vending machine- mom can't eat/drink, but dad might get hungry, if this takes a while
  • the baby book- so you can get those tiny footprints right after birth, when the hospital will have baby all inked up anyways
  • a book, word search, board game, etc.  labor can take a while and, especially if you have an epidural to help keep that pain at bay, you might be sitting around more or less "bored" while you wait for those contractions to work their magic.  you and/or your spouse may need some entertainment. 
    (even if you end up not using these during the labor, you might be glad you brought them some time over the next couple days, while you're waiting on discharge from the hospital.)
  • cell phone and charger to keep those friends and family updated
  • your contacts case and solution (if worn, you might wanna take them out during labor)

after baby makes his/her appearance, you'll likely be moved into another room for the rest of your stay.  now is when you'll realize just how awful all that hard work has made you look and you'll want these things to freshen up and stay a while:
  • toiletries: hair brush, hair elastics/clips, toothbrush and toothpaste, shampoo and conditioner, soap, a razor, deodorant, lip balm, lotion, q-tips, make-up, etc.
  • glasses or contacts (if worn)
  • loose fitting pajamas/nightgown- sleeveless or short sleeved since they'll be bugging you every hour for your blood pressure
  • nursing bra or a comfortable regular bra
  • nursing pads- some hospitals provide these, but i just bring my own.  better safe than spraying all over.
  • a robe
  • your own towel- although the hospital will provide you with one, if you don't bring your own.
  • your own pillow
  • slippers/comfy socks/flip flops- something to walk around in that's easy on and off and can easily fit your possibly swollen feet
  • pen and paper- for taking notes on what drs and nurses say, keeping track of feedings/diaper changes, etc.
  • snacks- now that you had baby, you're allowed to eat again!
  • a nursing pillow- i breastfeed, so that's an obvious one, but i've talked to formula feeding moms who just love using a Boppy or similar pillow to help support their newborns as well.
  • baby nail clippers and/or emery boards- all my kids came out with Freddy Krueger claws that i had to clip to keep them from causing bodily harm.  those little mittens never stayed on, so clipping/filing was the best i could do.


when it's finally time to go home, you'll need just a few things more:
  • granny panties- yep.  those mesh undies they give you in the hospital are FABULOUS, but when it's time to go home, you might want something a little more solid covering your rear.  even if you're used to only wearing thongs, trust me here, you want granny panties.  for one, you'll be wearing a giant pad and, if you had a rough go at labor, you may be stitched together down there and a thong just sounds straight torturous.
  • did i mention giant pads?  yeah, you'll need those now too.  the hospital will provide even larger pads during your stay, but once you leave, you'll want some heavy duty pads (i prefer the ones w/wings).
  • NOW is when you'll finally have to get dressed in "real" clothes.  i always opt for elastic (think yoga pants) or adjustable waists (like a wrap skirt), since there's no telling what size you'll be after delivery.
  • baby needs clothes too.  but, honestly, you only need to bring this ONE outfit.  the hospital has little onesies/tees for use while baby's a patient.  so just bring that one "going home outfit" and break it out now.
  • blanket for baby- same story, the hospital lets you use theirs during your stay, but you'll want something comfy and cute for that ride home.
  • the car seat (of course!)

things you just DON'T need, in my opinion:
  • diapers- the hospital provides these
  • wipes- same as above
  • clothes for baby (hats included)- same as above
  • blankets for baby- yep... also provided.
  • several changes of clothes- unless something goes wrong and you end up staying longer than expected, you only need a few sets of pjs and a change of clothes to go home in.  unless you feel you must get dressed everyday, which is up to you.  personally, i prefer the pjs.  much more comfortable for all the sitting in bed you'll be doing.
  • a breast pump- the hospital can rent you one, if needed
  • fancy pajamas- you will likely leak fluids and/or bleed on whatever you bring to wear during and after delivery.  don't get your recovery apparel from victoria's secret.

and there you have it.  i'm sure i'll think of more to add to this, but for now, that'll do.  feel free to leave comments on what you take and don't take with you!

simple flannel receiving blanket

as much as i enjoy being outside, it's been hotter than hot with an extra dose of humidity here lately, so i've been hiding in my air conditioned house doing a lot of sewing! 
one recent project was this super easy receiving blanket.

to make it i used:
1 yd flannel fabric
1 yd cotton fabric
pins
my handy-dandy sewing machine, loaded with coordinating thread
scissors
a needle and a bit of extra thread


after cutting the cotton fabric to a 30" x 36" rectangle,
i spread the flannel fabric out and smoothed it out.

(you only need a yard of flannel for this project, i just had this big piece of flannel on hand, so i just had a lot more to cut away after pinning.)


then my dog got on, so i shoved him off to one corner.


with the dog off to the side, i laid the cotton fabric down, wrong side facing up, on top of the flannel.


i then pinned the fabrics together, all the way around.  the more pins, the less movement, but i'm always lazy and only pinned every 4-5" or so. 
then i cut off the extra flannel fabric, leaving about 1/4" of flannel all the way around. 

you could cut it all even at this point, so both pieces are 30" x 36", but i'm always afraid of the flannel fabric pulling while i sew them together and having to start over, so i like having extra to work with... just in case i end up pulling out all my seams and starting over.  it's easier to line up fabrics when they're not exactly the same size. 
....this fear is based on a bad, beginner's experience 4 yrs ago.  apparently, i'm still not over it, since i make all my blankets using this extra step.  =)

but anywho... back to the project....


i then took it to the machine and sewed the edges, using a 1/4" seam, almost all the way around.


you want to leave about a 5" gap in your stitching.  (or whatever size will be big enough to put your hand through and turn it all inside out later.)  be sure to reinforce your stitching in the begining and when you get to the end.  that way, your blanket doesn't start to unravel while you turn it inside out.


NOW is when i cut the extra flannel off, trim up my edges and cut the corners at an angle.
(this helps the corners look "sharp" when it's turned inside out.)


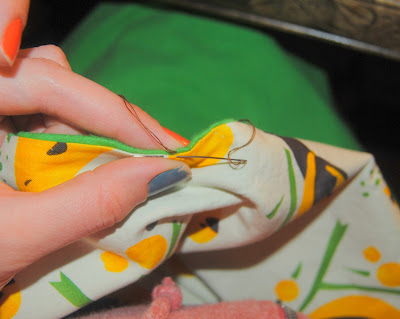
after turning it inside out, i poke my finger into each corner to make them as pointy as possible.  then i grab my good, old fashioned needle and thread and stitch that 5" gap closed.


next up, pick a stitch to use all the way around your blanket.  i usually just use a straight stitch, but i was feeling fancy this time and used this curvy one instead.  =)


easy peasy!

baby blanket makeover (DIY)

i thought i'd share with you this super simple baby blanket makeover i did. 
i love shopping for great deals and bargains, but sometimes you find something that's just almost perfect.  this is why i love spray paint and my sewing machine.  between the two of them, i can take something that's almost perfect and make it fabulous!  this time around, no spray paint was required.  =)


i found this baby blanket at marshalls.  it was satin on one side, faux fur swirled minky on the other and has a satin trim.  it retails for $23.99, but it was on clearance for only $5.99, so i HAD to buy it.  even if i didn't like it "as is."  i saw potential... i just had to figure out what exactly to do.  so it sat around for a couple months before it dawned on me.


this is actually a pillowcase that i bought about a month ago.  i was buying fabric to use in the new baby's nursery when i saw it and got it, even though, at the time, i had no plan for what i could use it for.  then, one day, as i sat and stared at my collection of fabric and that blanket with "potential" that was too good a deal to pass up, it hit me!


i took a quick measurement of the pillowcase and then the blanket (with my youngest's help) and i had figured it out!  the pillowcase was just big enough to cover the satin side of the blanket.  so i cut it open along the seams and measured out a rectangle the size of the blanket.  i wanted to leave the satin edging, so i only measured the inside rectangle, which was, in this case 27" x 37".


when cutting out the rectangle, i left an extra inch all the way around, to allow for a 1/2" seam.  so, i cut out a 28" x 38" rectangle from the pillowcase.


i then laid that on top of the blanket to get an idea of where i was headed... and i liked it!
(if you're short on time, feel free to skip this step.)  =)


next, i ironed out the fabric, which could have/should have been done before cutting the fabric, but i tend to get ahead of myself.  =)
this way, i smoothed out the fabric and pressed those 1/2" edges all in one step.


next, i took some No-Sew fabric glue and glued down the edges with a thin line of glue, all the way around.  No-Sew is a temporary hold adhesive, so it'll wash out later, but it held that edge down while i sewed the blanket together.


i glued the two long sides first, then folded up and glued the 2 short sides.  using the glue made it easy to re-position the edges, if needed, so that the corners were perfect and you couldn't see any of the folded under fabric.

then i sewed a 1/4" seam all the way around the pillowcase fabric... and forgot to take a picture of that step.  sorry!


here you can see where i've already sewn the 1/4" seam.  i then laid down the fabric on top of the blanket and pinned it to the blanket, as centered as possible. 
when making blankets from "scratch" i always fuss over them not being perfectly squared, but you know what... that store bought blanket was far from squared!  so i just did my best to center it, using the original seams as a guide.


i pinned it all the way around, but wasn't too fussy with it.  just every 4-6 inches or so.


then i brought it all the the machine. 
i used a 1/8" seam this time around and pulled out pins as i went.  as you can see, the corners aren't perfect, since the original blanket was a bit "off" but i'm pretty sure no one will ever notice.


ah, much better!  an all brown blanket was just missing something.  so this bright, retro floral is just what it needed!  and since it was a vintage pillowcase, it's all soft and worn in!


Monday, June 11, 2012

too cute for words, ladybug booties

today was a pretty dull day.  well, with 3 boys, i guess no day is "dull" around here.  but, weather wise, it was pretty drab.  cloudy, gray skies threatened rain all day, but i didn't see a single drop.  personally, i don't so much mind that occasional rainy day.  but it's gotta commit.  either rain and make the gray skies worth it or don't and be sunny and clear.  =)

luckily, today's meal was a crock pot meal, so i could just throw the ingredients in the crock pot and be lazy.  woohoo!  =)  since i spent all day yesterday cleaning up from the birthday party we had here on saturday, i was able to do some light cleaning to keep up with my "chores" i've assigned myself, but i didn't need to do anything too time consuming.  so, instead i did this...


aren't these the cutest little ladybug shoes ever?!?!


my sons are obsessed with ladybugs lately.  we had a few weeks where they were just everywhere and the boys would go out back and catch 40+ in a matter of minutes.


i'm not big on the frilly, pink, ruffled, "girlie" things that most people "ooh!" and "ahh!" over for baby girls.  but i did want to make my little lady some booties that were obviously for a girl... without being pink and having bows.

i tried and tried (for around 3 hours) to make up a bootie pattern on my own, the other night.  but, once i failed miserably a few too many times, i decided to go buy a pattern.  i, of course, went to www.etsy.com and went into idea overload!  i settled on a simple pattern from Hook Candy Crochet Patterns called the "Baby 2 Strap Mary Janes" that had these two little buttoned straps that were just too cute for words.  i made them in black and red and added a few black dots on the toes so they'd look like ladybugs.  and now i am just thrilled with them!
5 or so weeks from now, we'll find out if they fit! 

the world's largest ice cream sandwich CAKE!

...ok, i may be exaggerating a little.  =)

for my oldest son's 6th birthday, he wanted me to make an ice cream sandwich cake.  so i looked around at different recipes online and got some ideas here and there.  but, staying true to my "who needs directions when i can probably do that by just winging it?" style, i came up with my own plan.
this is what i did:

first, i lined the pan i was using with foil.  then i put down:
1 layer of ice cream sandwiches, a layer of hot fudge, a layer of a mixture i made that consisted of cool whip, mini oreos and m&ms, and a layer of caramel topping.


 then i started with a second round of the same 4 toppings...


ice cream sandwiches...


hot fudge...


cool whip with mini oreos and m&ms in it...


the 2nd layer of caramel topping...


and then one last layer of ice cream sandwiches to make a "solid" top.


i then covered it with foil and stuck it in the freezer over night. 
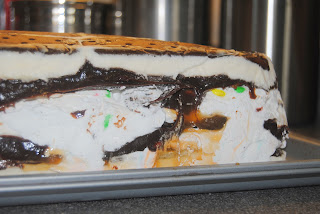
the next day (party day!) i took it out, took off the foil and flipped it over onto a baking sheet.  it slipped right out of the pan i'd used and i easily peeled off the foil that i'd lined it with to start...

 voila!  ice cream sandwich cake!

it was HUGE!!! 

to frost it, i used more cool whip (just plain this time around; no add-ins), drizzled even more hot fudge down the edges and wrote a happy birthday message on top.

we had 40 people show up for his party and there was almost half of this leftover!  it wasn't because people didn't like it though.  it was a hit!
thankfully, i have neighbors who took some home with them or this little baby i'm growing would weigh an extra pound from me eating it all myself!  =)


***if you want to make this for yourself (and about 50 friends!), here's a list of what i used:

3 boxes of ice cream sandwiches (12 per box)
3 jars of hot fudge
2 jars of caramel topping
2 of the big (16 oz) tubs of cool whip- one to mix for layers, another to "frost" the cake
1 bag of mini oreos
about half of a 19.2 oz bag of m&ms
and, of course, a large pan and foil.

~~~ YUMMY!!! ~~~
i think i WILL have my cake and eat it too!


Thursday, June 7, 2012

a new blog? why not? =)

welcome to my latest project.

i've always been a pretty sporadic house keeper.   my house is never really "dirty" since i DO manage general cleaning on a somewhat regular basis, but it remains to this day quite cluttered and "lived in".  

every so often, i'll go through and really clean it up, but then life happens and, before i know it, it's back to it's usual levels of mild chaos.  so i decided i need to come up w/a plan.  


first, i headed to pinterest to drool over the pics of clean, organized spaces.  this took a few hours and was called "research" and involved eating a kit-kat bar.  then, i actually clicked on some of the links i had pinned.  this led to 7 hrs of browsing organization blogs, my butt cheeks falling asleep and a few leg muscle spasms which led to quick walks around the kitchen island in efforts to alliviate them, due to the fact that i'm currently 8 months pregnant and probably shouldn't be sitting that long.  =)

around 2 a.m., i did fit in a few hours of sleep, but was right back at it the next morning.  i made a list of chores i needed to do daily, a list of weekly tasks that i then divided into 5 days worth and spread out over the weekdays (i gave myself weekends off!) and then 2 shorter lists for monthly and quarterly stuff.

i also have been spending a good deal of time looking for new recipes.  i am SOOOO tired of making the same things for dinner over and over and over again.  so i've been saving and/or pinning recipes and writing up weekly meal plans.  i can't say i'm doing a super good job at following this.  BUT it is really nice to know that if i do manage to set aside enough time to try a new recipe, at least i have everything in the cupboards.  i've been writing out grocery lists based on recipes vs. my old shopping style; buy what looks good and then figure out what to do with it all later. 

i'm currently about 2 weeks into these new projects and, for some CRAZY reason, i feel like i needed to add "start a new blog!" to my list of things to do.  perhaps, i'm just an oversharer.  or perhaps, if i'm doing this publicly, i'll be less likely to fail.

so, here i am.  because, i suppose it's better to try and fail, than to sit around and wish i'd done something, but never do anything at all.  i know i'll never be the perfect susie homemaker, but i'll be able to say, "at least i tried!"


"we may not have it all together, but together we have it all!"